GD.pm is a Perl module for creating PNG and JPEG files. Once created, these can be viewed with a number of different tools, including any modern web browser. Web servers often use GD.pm to dynamically create images for web pages.
We will be using Perl's GD module to produce graphics output as PNG or JPEG files. (PNG is an acronym for Portable Network Graphic.) PNG does not compress the image data at all, so it is a lossless medium, but the PNG files can be quite large when used to display photographic images, etc. Consequently, PNG should primarily be used to creating simpler graphics objects. JPEG (Joint Photographic Experts Group) is a compressed image representation scheme, so images in this format are lossy.
Before you can install GD, you must install several libraries on your system. To see which ones, I first downloaded GD from CPAN. The resulting README file included this:
http://www.perl.com/
http://www.boutell.com/gd/
http://www.libpng.org/pub/png/libpng.html
http://www.gzip.org/zlib/
The first item is no problem, but the second is somewhat difficult. You need
the gd graphics library, libgd. (The files /usr/lib/libgd.a and /usr/lib/libgd.dll.a.)
This comes with cygwin, though you may not have installed it. To check, run
your cygwin installer. GD is grouped in Cygwin's Graphics packages.
You will also need to make sure that you download cygwin's libgd-devel
and libpng packages. You might also want to download the jpeg libraries
(libjpeg) there, if you haven't done so.
Once you've got all of that installed you can complete the installation of GD.pm in the usual way. If you are interested, here's the transcript of my installation of GD.pm.
Okay, provided all that went okay, we're now okay to start using GD.pm. As
a simple first example, try running gd.pl.
This program will output a PNG image to stdout. If you want to be able to display
the image, you'll have to save the output to a file (try perl gd.pl >
myImage.png)and then use a viewer,
such as a web browser, to look at it. You should see something like:
GD provides basic image construction tools similar to the abilities of a paint program: you can draw lines of various types, polygons (filled or not), text in different fonts. Also, images can be rotated, flipped, etc. Various "brushes" can be used. To see documentation on the full range of tools you can check out GD's documentation. If you want, when you are installing GD.pm you can use the makefile to create html documentation for the module. Or, you can just look at an on-line version of the same, here.
To see how some of these operations work, I fiddled with the program that yielded the image above, gd.pl. First I commented out all of the commands that create any graphic output, then re-ran the perl program. I examined the resulting image (it was empty, of course). Then I un-commented each of the lines in turn, re-running the program each time to see how the resulting image changed. Here's a movie that shows me doing this.
There is code at the top of gd.pl that creates Color objects. These are used in combination with the various drawing methods to color the resulting objects. A color is defined as an RGB (red, green, blue) triplet, each value of which varies from 0 (all off) to 255 (all on). Thus, (255,255,255) is white, and (0,0,0) is black, and (0,125,125) is a darkish blue-green. Colors can also be made with an optional fourth parameter, an alpha channel. This can be used to provide colors that offer a level of transparency. This is affects the image that will be seen when two objects overlap.
Polygons are created by generating an empty polygon object and then adding points to it as the vertices of the polygon. To create a line-drawn polygon, use the polygon() method. To create a filled polygon, use the filledPolygon method. (Many objects can be either line-drawn or filled via methods that are analogously named.) The fill() method floods an area with a specified color starting at a given pixel (specified via its x-y coordinates). The "flooding" stops at pixels that are a different color than the starting pixel.
Paintbrushes are simply a pattern, though they have at least some "invisible" pixels.
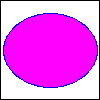
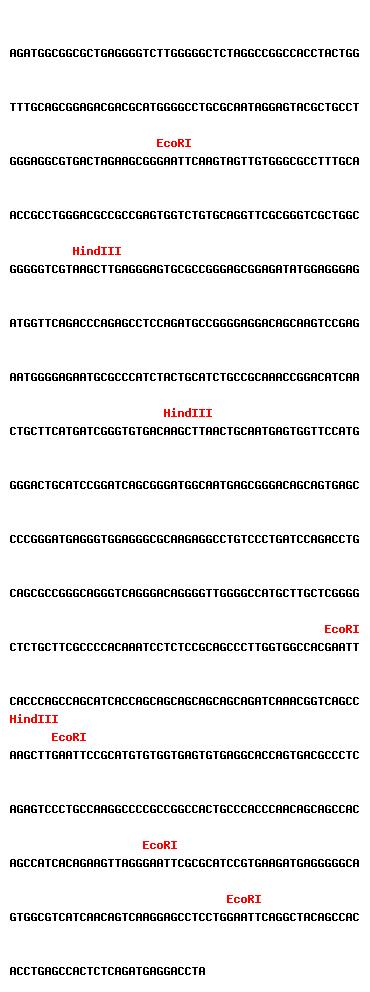
In a previous lecture we explored the creation of a class, Restrictionmap, that could generate a graphical depiction of the locations in a sequence at which given restriction enzymes would map. In that case, the graphics took the form of a sequence of strings which could be printed to the console consecutively to render the desired "image".
Now that we have GD we can use it to generate similar images via both PNG and JPEG. To do so, edit Restrictionmap.pm and remove the first "=head1" line from the file. (I placed it there so that we could compile Restrictionmap.pm without first having to install GD.) The file testRestrictionmap_png.pl is a slightly modified version of testRestrictionmap, which we looked in the previous lecture. First, I set the second sequence to be drawn via png via this code:
my $restrict2 = Restrictionmap->new(
    rebase => $rebase,
    enzyme => 'EcoRI HindIII',  # GAATTC # AAGCTT
    sequence => $biggerseq->get_sequence,
    graphictype => 'png',
);
Next, at the bottom of the program, I changed code so that the generate graphic would be output to a file, instead of to standard output:
## Some bigger sequence

my $biggerseq = SeqFileIO->new;
$biggerseq->read(filename => 'map.fasta');
#$biggerseq->read(filename => 'sampleecori.dna');

generateGraphic ( $biggerseq->get_sequence, 'png');
generateGraphic ( $biggerseq->get_sequence, 'jpg');

sub generateGraphic {
    my ($sequence, $graphicType) = @_;

    my $restrict2 = Restrictionmap->new(
	rebase => $rebase,
	enzyme => 'EcoRI HindIII',  # GAATTC # AAGCTT
	sequence => $sequence,
	graphictype => $graphicType,
	);

    my $OUTFILE = "restrictionMap.$graphicType";
    print "\nStoring $graphicType graphic of map of the sequence in $OUTFILE....\n\n";
    unless (open(MYOUT, ">$OUTFILE")) {
	   die "Couldn't open $OUTFILE for output.";
    }
    print MYOUT $restrict2->get_graphic();
}
The code for generating the images is straightforward. First, a text-based representation is acquired using our old text-based method. The program then iteratees through that text, line-by-line, using GD's text drawing capabilities to render each line's text. The code has to calculate the height and width of each line, which allows it to determine the overall size of the image. Using that same information it calculates the x-y coordinate for each line. The main difference between these grapical outputs and the text-based approach is that we can color the names of the matching restriction enzymes. The JPEG version of the output, restrictionMap.jpg is below. If you look closely at the image you can see that some of the letters appear to be a bit fuzzy--the red text bleeding into the surrounding pixels. This is an artifact caused by the lossy compression technique that JPEG uses. The PNG version of the output, restrictionMap.png is much cleaner.
![]()
In the next example, we use a simple Perl module, GD:Graph to generate a simple bar chart. First, I download the GD::Graph module and install it.
Matt Evett@csc-79jtl21 /cygdrive/c/Documents and Settings/Matt Evett/My Document
s/Downloads/Perl/GDTextUtil-0.86
$ perl Makefile.PL
Your GD installation claims to support TTF fonts, but it fails to load
the included test font. The module tests will also fail because of this.
If you are certain that you have correct TTF support in your GD module,
please contact the author of this module with as much information you
can provide about your installation.
Continuing...
Checking if your kit is complete...
Looks good
C:\cygwin\bin\perl.exe (2844): *** unable to remap C:\cygwin\bin\cygfreetype-6.d
ll to same address as parent(0xDD0000) != 0xE60000